

Rooftop Artist’s Studio, Miniature by Noel & Pat Thomas, 2002
- To make an artist’s studio, start in 1960 when you are 14. Into a large bowl pour one trip to New York City to see your art student/coffee house waitress older sister. Sprinkle in one bitter espresso brewed in her tiny stove-top pot. Next, walk around the Lower East Side and Canal St. At Katz’s, bite into your first pickle. Fold in a blintz and celery soda. This will take about an hour. Head uptown and a little west to find a friend who lives in a building with an AS Beck shoe store downstairs, and a dying potted palm leaning out over the rooftop. Hike the 6 flights to the roof. Be careful while following the duckboard path past the palm tree to the peeling door of the one-room rooftop house. Or studio. Or shack? Savor the light-filled room and city views, the mess of sheet music, books, bedding, pieces of instruments, and a whole harpsichord. Leave with one $5.00 guitar and a love of rooftop nests. Mix together all of the above, set aside, and wait 40 years.
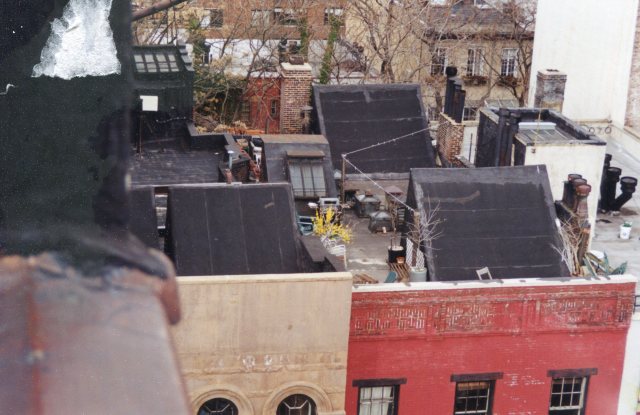
Looking across W. 11th St. NY, NY 2000
- Whisk ahead to the year 2000. On a Greenwich Village rooftop, sip a morning coffee with your spouse/partner-in-crime Noel, and friend Michael, upstairs from his W 11th St. apartment. Soak in the crusty neighboring roof-scapes—the jungle of water towers, electrical wires, skylights and chimneys, mixed with steam stacks, prized pocket gardens, and mysterious slant-roofed structures. Sift some stories of the Village’s legendary attic studios. Toss around the idea of a free-standing miniature artist’s studio, with a north-facing glazed wall–perched on a roof like this. Poke it and turn it. Stir in the first part. Pour all into your biggest saucepan. Turn up the heat.
It may have taken 40 years to cook up our rooftop studio, but it finally boiled down to a simple, teachable building with a utilitarian city roof for landscape. As with most of our work, the final piece is an interpretation of existing structures, tweaked over time by our imaginations and memory flashes.
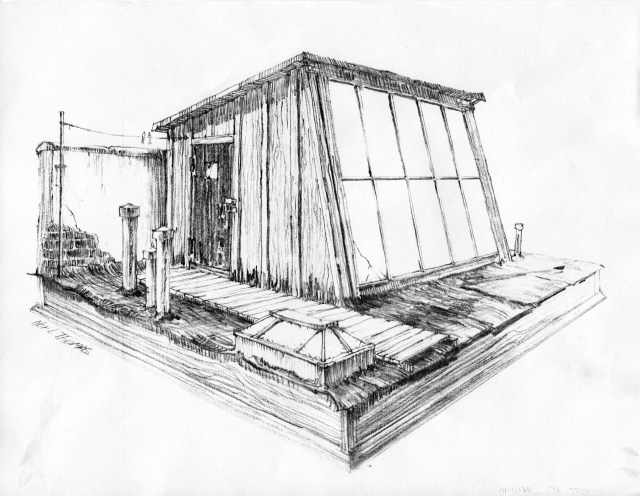
Home from New York, Noel made the above sketch for the 2002 Guild School workshop. The building itself is a pretty simple board-and-batten box with a slanted glass front—the fun part was seeing what kind of detail we could bring in to make it feel real in its setting, and then to set our minds on how we would make that happen. For example, Noel designed the roof (the “ground” on which the project sits) with a skylight (similar to the one in the hall outside his full-scale painting studio in downtown Astoria). A great, unusual detail for aging, and a great place for a hidden light, but in a 5-day class?

And so, we come to the diagram, complete with corrections and changes and which, if you weren’t in class, may seem close to incomprehensible, but please read on.

Skylight Ingredients: wine bottle lead, 1/8” window glass, ¼” plywood, Elmer’s white glue, black ballet dress netting (tulle), black & metallic spray paints, Blacken-It, Brass Black, Patina Green, Thalo green and Permanent white acrylics.

To save class time, Noel cut and assembled the basic skylight structures—a glass box with a wooden base–for the students to finish. The base is simply a box of ¼” ply strips. For the glass structure, he carved a wooden form to build it around. Next he cut 1/8’ window glass panels with a glass cutter, beveling the edges with a glass grinder. He tested the fit by setting the pieces over the wooden form. The beveled edges were then glued together, with lots of, yes, good old Elmer’s. It was tricky, but eventually he got all the glass to stay together. He did not try to make the top edges meet. Instead he carved a wooden cap that the students would glue to the top edges of the glass, giving the whole piece more stability. Finally, he glued the base to the bottom glass edges.

While Noel wrestled with the glass, I glued on battens and flooring.
Skylight glass needs wire mesh reinforcement, so it doesn’t break so easily (remember the “chicken-wire” mesh in school door glass?). Some late-night thinking led to my trying tulle, the stiff netting fabric used for ballet costumes. The most realistic color turned out to be black netting, sprayed with metallic paint, then lightly dusted with black (not that anybody would ever see it, but we knew it was there, and maybe a little showed through the glass). Using the glass panes for a pattern, I cut the netting to fit. Tulle, even with paint on it, is not as stiff as imagined—when I tried gluing it to the underside of the glass it became floppy, and wouldn’t stick. Next trick was to stiffen the netting pieces first with Elmer’s (before spray painting), on the table, laid on a strip of wax paper, painted with glue and allowed to dry. Then spray paint, and dry again. Next, I painted a light coat (thinned with water) of Elmer’s on the underside of the glass, and pressed on the stiffened netting sections. The glue residue gives the glass a desirable cloudiness, but if it’s eye-catchingly messy, you’ll have to do some cleaning up.
The best part was making the whole look like a metal structure, starting with cutting and gluing on strips of wine-bottle lead to cover the cap, base, glass edges and imagined reinforcement mullions. Then the aging–applying Blacken-It, Brass Black, and Patina Green (lightly applied & dried until you get a patina that looks right). When dry, we went back in with an acrylic patina wash (water, Thalo green, Permanent white) to soften the effects and meld the colors. And maybe the tiniest bit of bird poop (white tube acrylic dotted with whatever color food they might have had for lunch).

As you can see, the roofing strips (and later a lot of tar goop (black tube acrylic)) laps over the bottom edge of the metal framework to act as flashing.
With that food for thought, I’ll set this aside for now. The next entry will include side dishes such as rooftop vent pipes, electrical wiring, and painting faux bricks.
*Last but not least, for those of you who made it this far: a reader recently found a current (Feb. 2017) website for old mini magazines, including many with my old Creative Notebook articles: http://minimagindex.com/index.php

Pat, your writing style is so delightful to read. I think even if someone weren’t even remotely interested in miniatures they would enjoy reading about how you and Noel created your masterpieces. Thank you for sharing your techniques and discoveries with us. Maybe your blog needs to be compiled into book form – it reads like a wonderful novel.
Thank you Anne, you can probably tell I enjoy writing them. Maybe a book, first I have to finish!
You are a constant inspiration and source of information. Thanks to both of you for sharing your art.
Thanks so much, AVA.
I love rooftop structures in NYC. And l love reading background stories to miniature structures. And it would probably take me 40 years to build it in miniature! When I first started reading, I thought you were going to say you started building it when you were 14. Just building that skylight – which looks so realistic – and I love the bird poop addition – would take me ages. Thank you for all the detailed description (and your description of the process). I am excited for your next blog post!
Thank you, Penelope!