
Eons ago–in the early 1980’s–a miniatures columnist wrote that Noel and I looked “slim in our jeans,” a term which still makes us laugh. We, indeed, lived in jeans, in our studio, building mini houses as fast as we could to keep us tricked out in no-name jeans and sweatshirts. We “dined” on sandwiches and Lean Cuisine from the slide-out cutting boards at the end of the studio worktable. Hours were long, and “vacations” entailed delivering houses far and wide, and, later, teaching, with multiple little houses and their parts in tow. By 2005, with 60 projects under our belts, both we and our jeans were definitely worse for the wear, and fresh ideas for projects were hard to come by.
Spring of 2005 found us nosing a tight proposal deadline for the 2006 Guild School. Our only design idea was for some kind of European stucco or plaster building, along the lines of our 1993 Toymaker’s Workshop. But we hedged–plaster has tricky drying times, and unpredictable results–did we want to bring that into a class? Being true procrastinators, we decided to go to Paris and Prague, to celebrate our 30th wedding anniversary, in hopes the trip would give us the inspirational shot in the arm we needed. If nothing else, it would be a great escape.

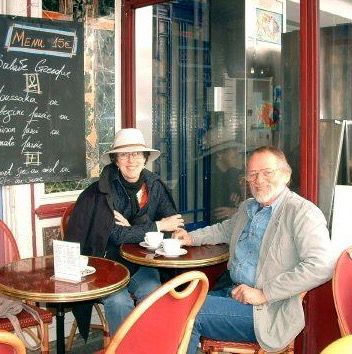
No, that’s our friend Catherine Soubzmaigne’s arm as she’s touring us around Paris.

It was spring, and the city was a-bloom. Worry about the pending deadline lifted—we had bridges to cross, museums to see, café lattes and vin rouge to sip.
Dawdling in Paris
Once home, we had two weeks to pack the current class for Maine, and to come up with a proposal sketch for the following year. Our initial notion to create an artisan’s cottage inspired by Prague’s Golden Lane hadn’t visually panned out—it was the neighborhood and history that was interesting, not the individual structures. We flipped through our trip photos of bookshops and 2nd hand stores, decaying utility pipes, sidewalks and cornerstones.


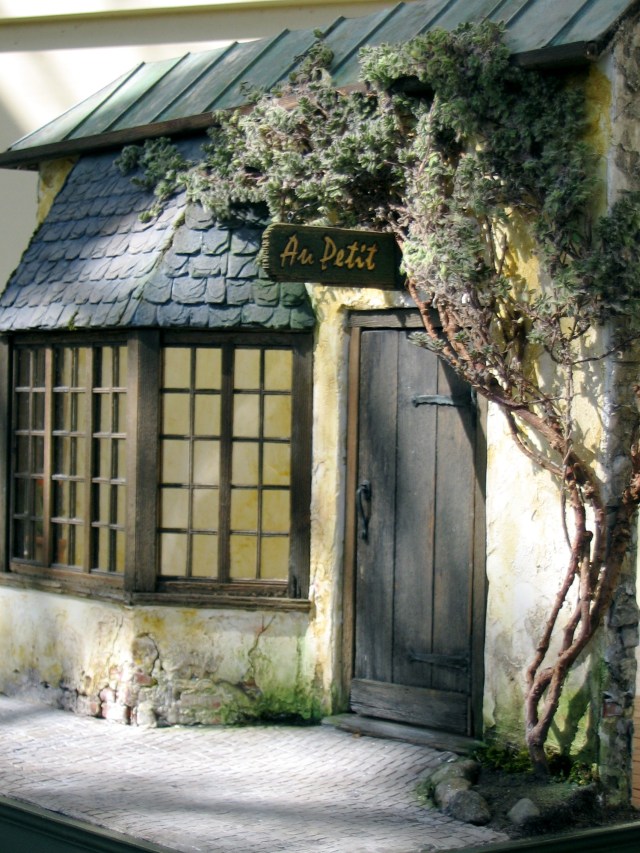
Overall, I was favoring the cozy interior of a Mexican restaurant we found in Prague on a cold, dank day, but nothing was gelling for Noel. Finally, the magic element slipped out of a file of past project ideas—a magazine photo of a small shop in Worcestershire, England—a place we had never visited. It had all the elements—venerable stucco, engaging bow window, a slate roof, aged wood plank door. By making it a fragment—a section of a corner building–with just two exterior walls, we could include the Mexican restaurant’s golden-walled, red-tiled-floor interior as part of the class. Luckily ,the proposal involved “only” a quick drawing, which, with some crucial elaborating, Noel adapted from the Worcestershire building into what we still thought of as the Artisan’s Cottage.
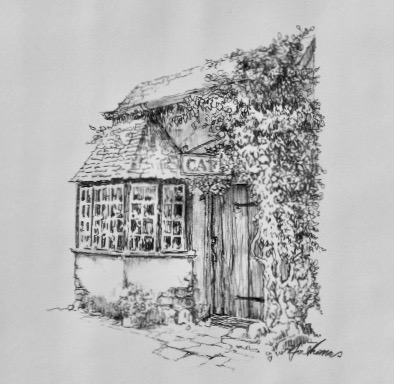
Noel’s sketch for the new project

Months later, back in our work jeans, we had the prototype walls up and secured to the base, ready for “stucco.” Plaster of Paris (aka gypsum) this time would prove to be a versatile and mostly predictable medium. Appropriately, Paris is famous for its plaster-coated buildings and gypsum mines–spend an afternoon sipping a café latte in Montmartre, and it’s all around you.
In the past, we had experienced adhesion troubles with plaster of Paris. This time we tried Activa Art Plaster from an art supply dealer. I don’t know if it had additives, or not, but it stuck where we wanted it to, was highly carve-able, and took color washes well. We used it for the walls, inside and out, as well as for the cobblestones and street.


After plastering the walls, Noel began laying “cement” for the sidewalk. The cement consisted of plaster, colored with Grumbacher Mars Black and Raw Umber tube acrylics. He mixed the neutral grey coloring and plaster in small batches in a plastic cup. He then spread the plaster about 1/16”-3/32” deep—just deep enough to carve in the paving pattern without hitting plywood. Next, using a ruler, pencil and small engineer’s square, he marked the paving stone grid on the dry plaster at 3/16” to ¼” increments—a little tedious, but not too bad until we had to use a lot of Zen to steer the somewhat wavering grid gracefully around the corner. It’s like laying tiles, or mini bricks and trying to keep your lines straight until suddenly they’re not, but this was thousands of tiny tiles.

Our small paving stone pattern and size favored Prague over Paris.


Parisian cobbles tended to be larger, and were often more rectangular, while Prague used a smaller stone, perhaps because they were easier for the populace to pry out of the street and throw at their many invaders.
As happened so often in our work, Noel set up the job, then I continued so he could go on to the next phase. Using an Exacto knife, he carved a section of stones, showed me what he’d done, and I took over. Carving into the plaster was fairly easy, but scribing consistent patterns, basically free-hand over the indicated grid, took some concentration. It needed to flow. I scribed smallish sections at a time, aiming to keep the lines parallel and perpendicular, but also with some waviness. I used a toothbrush to clear the lines, and a small flashlight for better visibility. Variation in stone size was inevitable, and variation in depth and width of lines was desirable–the deal was to keep the stone patterns and sizes balanced, in scale, and convincing. When things got out of control (usually the stones getting too large, or lines wandering too far off straight), I erased with a new layer of plaster. When the plaster got too hard to scribe I moistened it with water. After scribing the grid, I went back with the tip of an Exacto to slightly bevel the stones—not every edge of every stone, just enough to suggest to the viewer what was going on and let his or her imagination complete the task.
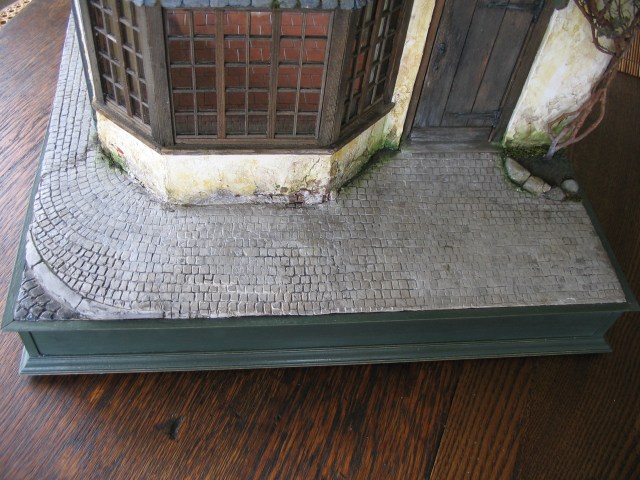
Later Noel came in with washes of Payne’s Gray and Raw Umber to make the final aged-stone color. The surprise of this lengthy and often tedious job was that it became mesmerizing, and addictive—nearly every student completed their sidewalks during the class week.

Copper roofing viewed from our hotel window on rue Valadon in Paris

The copper aging began on the work table with rubbing down each strip, before embossing, with 4/0 steel wool, enough to cut through the lacquer. Next, we embossed the standing ridge seams by pressing the back of the copper strips into a wooden jig–using an engineer’s square and hammer–to form the squared-off grooves. We then applied Brass Black chemical with a 1” wide sponge brush, working it in until the metal turned evenly dark. The panels were allowed to dry on a slant, so that the aging would mimic that of a full-scale roof. To even-out the finish and warm the color, we applied a Patina Green Wash made from tube acrylics—a little Titanium White, a little less Thalo Green, and water. It’s good to start out with a thin wash, then add coats as needed after each coat dries. Finally, a Dirty Water Wash (Mars Black—4 dabs—Raw Umber (3 dabs), and lots of water) was applied over all, then set aside to dry. Each step took some fiddling to get an even, overall look, so, if you try this, have patience, and extra copper. The finished copper sections were then glued to the plywood roof with Elmer’s and spots of Flash super glue, then secured with a few tiny nails. The roof was then taped in place and allowed to dry. Once it was dry, we capped the top roof edge with a 3/16” cove molding, glued cove side down and behind the copper. At the bottom we added basswood gutters.
Next up was figuring out the slates for the bay window. Using real slate was out—far too expensive, and too heavy for shipping. Instead Noel came up with the illusion of slates by carving them from Winsor Newton 300 lb. rough watercolor paper with an Exacto knife. First, he cut the paper in strips 3/4” x 14”, then used the knife to mark shape slates ranging from 3/8”- 12” w X 3/16”x ½” deep, like a row of teeth, without cutting through to the top edge of the strip. Next, he notched and beveled the lower edges of each slate with the knife tip, followed by layering slate texture over the whole surface by carving and shaving the paper. Once the carving was complete, he painted the slates with a gray watercolor wash of Payne’s Gray and Titanium White Gouache, warmed with a little Raw Umber. The dried strips were then glued down with Elmer’s, in rows approx. 3/8” deep. The final touch was gluing bits of dried moss between the seams. Et voila—slates!

Paper slates


Originally, we thought Plaster would work for the interior floor. The reality was it made a mess—when Noel tried painting it terra cotta, the white of the plaster kept leaking through, making the finish chalky, uneven, and mucky-looking. Vetoing that, we went back to our old standby of red, brick-pattern Armstrong vinyl floors tiles—our standard brick material–this time using the bottom (smooth) side, cut in 1” squares.


Finishing touches:

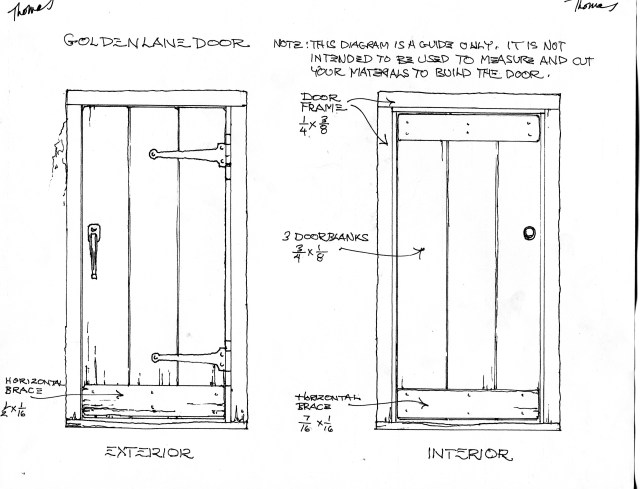
The plank door came strictly out of Noel’s imagination. It was built from scratch–cedar planks wire-brushed and Bug Juiced for age, then darkened further with watercolor washes. We hung it with brass hinges, counter-sunk, and hidden behind the framing, and cut the faux wrought iron handle and hinges from lead serving tape (from the plumbing section, hardware store) aged with Brass Black and glued on.

Finally, it was down to the shrubbery–how to make a wonderfully gnarly tree that would spread over the entrance. It began with a dead branch of rosemary we’d saved because of its graceful curve (and then had to cull many more of for our students!).

Cafe chairs and table by Catherine Soubzmaigne

Creeping thyme

I glued it on with Elmer’s, small bunch at a time, holding each section in place until it adhered. Bits of wax paper between fingers and leaves helped. Yes, it takes patience, but it’s the crowning glory of the project, and, it’s great to be able to design your own tree.
Once the tree was done, Noel got to do his favorite thing–aging and adding the aging washes, the bits and pieces of rock, moss, dirt to create the illusion of a piece of history, built out of the ground, and weathered by time.
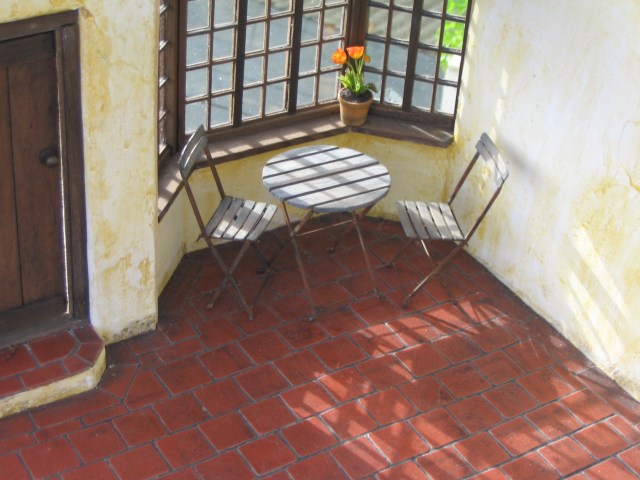
Interior based on the restaurant in Prague where we warmed ourselves with hot plates of Mexican food.
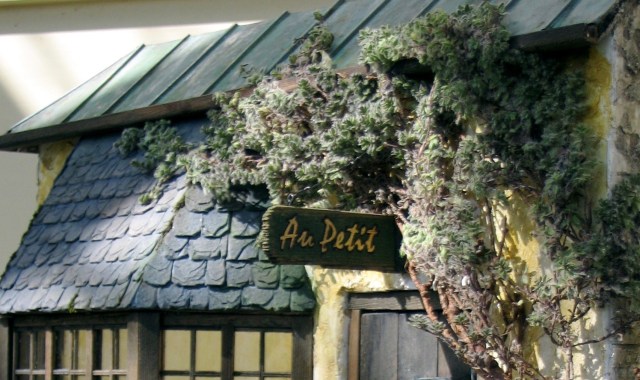
What came to mind was another, earlier time in our lives, about 1974, when we first dated in Los Angeles, and really were slim in our jeans, It was a Friday, and after work we were heading out for the weekend to go camping on the Kern River. Noel got invited to lunch at a romantic French restaurant by a supplier (a very pretty supplier), and I was a bit miffed. The restaurant was called Au Petit, and it served the best escargots west of Paris. Double-miffed. However, that night after we’d pulled into the campsite, Noel fired up the Coleman stove while I poured the wine and unpacked the dinner gear. He said, “I’ll make dinner–wait here,” and returned to the camper, deftly re-emerging with–Voila!–two trays of Au Petit‘s escargots, ready to heat up on the stove.
To my faithful readers–the next entry will be the last, as it is about the last project we made–#61. I have promised myself to have it done by the end of the year, so please stay tuned, and I thank for your patience and on-going support.

Your work to this day is still spectacular and I have faith it will always be. You are my inspiration to continue an ongoing miniature house that I saved from the garbage can 30 years ago. It was a second empire that I’ve changed into an 18th century French Aristocrat’s home. Work is always ongoing and I am attempting to build a bedroom worthy of an French Aristocrat’s wife.
Thanks, Patrick. Keep at it!
Ah Pat, there is such a book in this all! A book no one has ever written before … it could be wonderful!
christi
Thanks Christi–in another format it could be.
I have read all your posts and your work is astonishing but you have probably heard that before. Sorry to have missed taking a ride with you and feel the grand parade is over, sorry to say. Thanks for all your sharing. Mary Ciccolella
Thanks Mary!
I found you. I lost you. I found you again. And now I’m going to lose you again! Oh no!
I am probably much like you, I no longer work on my minis. But that doesn’t mean I don’t love them. They still capture my imagination. But I have a problem. My Daughter-in-law has asked me to begin to eliminate my collections. What do you do with your houses and miniatures when your children and Grandchildren don’t want them? I have small things made by great people that only others who share my passions would understand. Things collected from we’ll know artists who worked in miniature. What do you do? Maybe you have another post after all. I can be the only one out here with this problem.
Thanks, Linda. It is tough getting rid of your minis, for many reasons, and tougher still to find the people who can appreciate them. Maybe I will try an entry on that, if nothing else to start a discussion that others can join in on–it’s a universal problem.
Thank you once again for a lovely sit down and lean in kind of story. My favorite kind. A fan, Laurie Sisson
Thanks so much, Laurie!
Inspired prose, great mind picture: “easier for the populace to pry out of the street and throw at their many invaders.” A tour guide in northern (Baltic) Poland last May said that so many of the street cobblestones had been repurposed through the years, that the street cobblers cut the remainder in half to re-pave the street. Cobblestones and practicality.
Thanks. Madeline!
I will miss your wonderful posts, I loved reading every one, thank you 🙂 The projects are so very inspiring and perfect—
Glad you’ve enjoyed it all, Linda. Hope it keeps inspiring you down the road.
Thanks, Linda.
Stunning.
Thank you!
Would it be possible to add a picture of the jig used to make the tin roof, or to explain how to make the jig? I love tin roofs, and my farmhouse dollhouse needs one! I will miss reading your posts.
I think we just glued stripwood, either 1/8” sq. or 3/16”sq. on a strip of plywood, making vertical stripes at the increment we wanted—maybe 1 1/2” apart, then pressed the metal sheeting into the form. Sorry to have no photos or actual measurements—those are gone with the wind.
But that was for a Parisian copper roof. If you want an American tin roof, I think you can buy corrugated tin through miniature suppliers.
Thank you!!!