

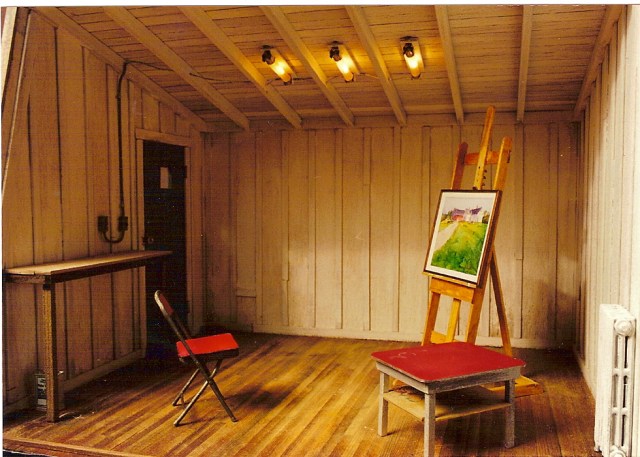
Finishing details of the Rooftop Studio miniature project
The rooftop studio was #59 of our miniature buildings and houses, completed in 2001-2 almost thirty years after #1. If we stick with the minis-as-meal-prep metaphor, all that time we wished we had a sous-chef—someone to build the basic structures to our exacting, often off-kilter standards, then be at our beck-and-call to finish applying battens, bricks, shingles and flooring so we could focus on the cooking, plating and garnish. Snubbing our customary less-is-more credo, the rooftop setting begged for many and varied garnishes, starting with the alchemy of turning a wooden dowel into gritty, galvanized vent pipes.
Vent Pipe Ingredients: 5/16” X 3 1/8” and ¼” X 3 1/8”wooden dowels with a hole drilled in one end, Rustoleum Cold Galvanizing Compound, Patina Green (see diagram for recipe), acrylic patina wash, a small piece of 1/8” wood to plug the vent holes, masking tape, push pins.
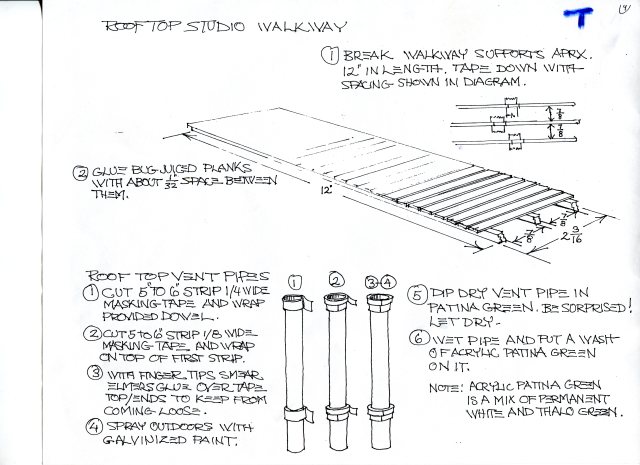
Rooftop vent pipes and walkway diagram.
To “galvinize” a dowel, stick a pushpin into each length in the end without the hole (see ingredients above), use the pushpin as a handle and prime them by spraying (outdoors) with the Galvanizing Compound. Do this on sheet of cardboard or disposable tray. Allow to dry. Be skeptical while wrapping the tops of the pipes with masking tape, telling yourself this will soon look like galvanized metal pipes. After applying the tape as per the diagram, take the dowels outside again and spray with more galvanized paint–allow to dry. Next, hold dry dowel by pushpin, dip in Patina Green aging chemical, et voila!–watch it turn a burnt rust color (the men in our classes were particularly thrilled with this make-over). When dry, dampen the pipes with water on a paintbrush, then paint on a thin wash of patina green paint to further the aging. Cut pipe holes in roofing (through already drilled holes in project base), glue a small piece of 1/8” doorskin (or any scrap of stripwood) to the underside of the hole. When the glue is dry, glue vent pipe in place.
In previous entries I’ve covered rolled and tarred roofing, but I thought you might enjoy Noel’s detailed diagram (above), complete with blemishes and edits, to show the whole process. A student comment sheet from the first class said, “It was more than I expected–I didn’t know I would laugh as much.” Looking at our diagrams, I’m relieved he wrote “laugh” instead of “cry.”

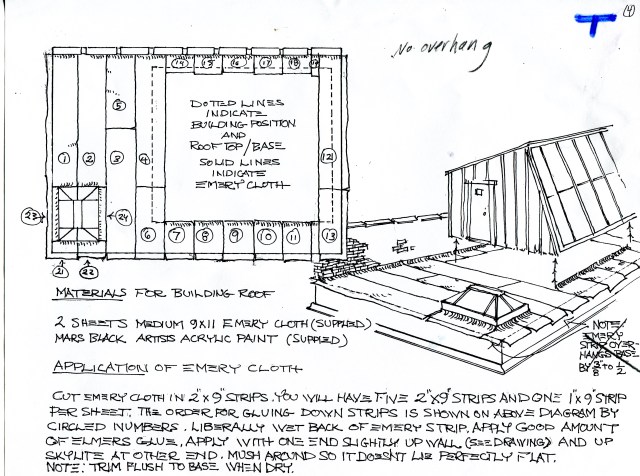
In-facing brick wall before aging.
Due to its size, the brick wall might be considered more of a side dish than a garnish–whichever, here’s how we did it. To save time, weight for shipping, and to preserve our dwindling reserve of vinyl mini bricks (and also because we can’t stand leaving raw plywood on a project, even if it will spend its life against a wall), here we reverted to less-is-more. For the inside, or front-facing side, we used bricks enough to establish the illusion of “brickness,” grouted them, then filled the remaining space with spackle that was then aged with acrylics and watercolors to reflect the decades of grime, sootiness and mold on a mostly hidden exterior city wall.

Inside wall with acyrlic and watercolor paints for aging

Inside wall aged to simulate years of city soot and mold.

Rooftop bricking diagram
Although the back of the wall will be seldom seen when the project is displayed, you want something there that doesn’t break the illusion, should anyone look. And, its’ a great place to practice your painting skills.

Back view of the Rooftop Studio
Because the back wall will get little scrutiny, it’s a good place to start practicing the techniques. To smooth the bare plywood surface, Spackle and sand the ¾” ply to make it flush with the base. Then paint the whole piece with reddish-brown latex paint. Once dry, glue on the dimensional bricks, then segue into painted bricks, then finally, let the rest speak for itself. And don’t forget the aging paints. For more details on our bricks and bricking techniques, please see the entry titled A Brick inTime, 7/16/2011.
The truth of mini electricity:
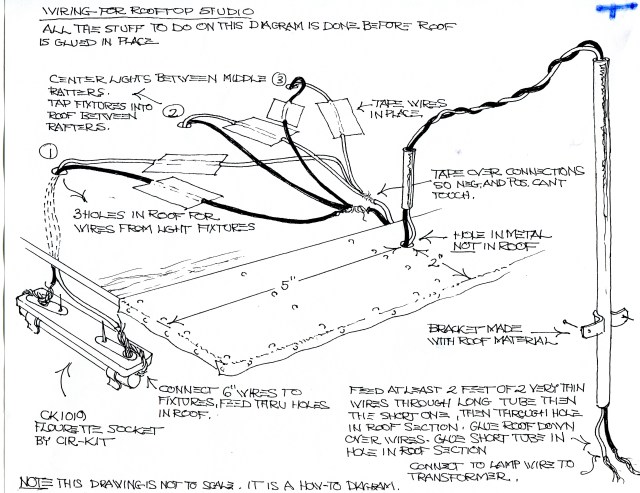
Wiring–aka Point A
The lighting of a project—the mood, the ambiance–takes work enough to be considered a main element for the head chef. As romantic as the end product may be, there was nothing pretty about Noel’s technique to get the job done. It was strictly a nitty-gritty process, with a little magic thrown in. I’m only showing it here to reveal how imperfect what’s out of sight can be, and to say it’s okay, as long as it works.
Wiring ingredients: Red and black thin electrical wire (the finest you can find), 1/8” copper tubing–2 pieces cut to the length needed, 3/16” wooden dowel, Brass Black, 4/0 Steel wool, Patina Green (chemical), plug-end mini transformer.
To get from Point A to Point B, pin mini flourette fixtures to the ceiling. Then feed each set of wires through a hole to the roof, bring all the wires together, reduce them to the two wires that will go down the utility pipes, then through a hole in the metal roofing, and up into the short pipe on the studio roof, over to and down the taller pipe on the big building roof, and eventually down to the tranformer wires underneath the base.
You’ll want to file and sand the metal pipe ends to make them smooth. tubing to smooth them. Next, dull the shine on the tubing-now-utility pipes with steel wool. Once you have the wires braided down to two nice long ones, feed them through both pipes—short first, long second. Age them with Brass Black and Patina Green, allow to dry, move the long pipe away from the short so you can glue the short one in place, “caulk” the short pipe to the roof with black paint. Use the same paint to color the exposed wiring.

Wiring: the inside story

The hoods covering the top of the pipes are made from the wooden dowel. Cut a length of dowel and drill a hole down through the center. Slice off a section of drilled dowel approx. 3/8”wide, and cut in half (to make two equal half circles). Bug Juice to gray, then paint to match pipes, and glue on top of the wires. Repeat the process for the longer pipe, later, once you have attached it to the building with a bracket made of the metal roofing material, as per the diagram.
When your project is complete, feed the two wire ends through an inconspicuous hole drilled in the base, then braid them to the two transformer wires (along with any other lights—as in under the skylight and over the door), do a little sun dance, and plug it in—Lights! Call yourself brilliant. Messy?–yes. Maybe complex, but not complicated–you don’t need an engineering degree to do it. When you are done, send your compliments to the chef, and take a bow.
***
SOLD!

What an amazing piece! Fantastic beyond words!
Thanks, Kathy, it was fun to make.
Pat….I used to be on your mailing list but lost you when we switched our email server. How do I get back on
Hi Carol, Yes, you can re-up by clicking on the Sign me up tab at the top right of the page, right under Email Subscriptions. Thanks, Pat
Hi, Pat (and Noel, of course)! Thanks so much for sharing this project–it must be a lot of work to get these instructions on-line, but they’re beautifully written, and make me want to begin galvanizing dowels immediately! What a treat to find in my in box. Thanks again,
Best,
Amy Marshall
Have fun galvanizing!