
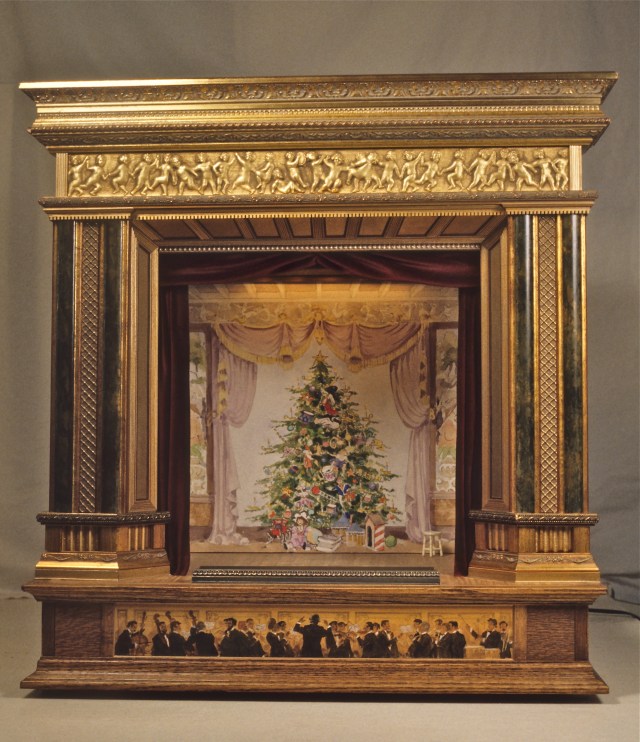
Davis Miniature Theater with Nutcracker Christmas set
Most of the year 2000, while the world recovered from Y2K madness, we spent in the studio wrapping up the lagging miniature theater project. It became a matter of, finally, shelving everything else to finish in time for the client’s 60th birthday celebration.
What began as the germ of an idea over dinner at the client’s home, would be presented in full bloom at his birthday dinner at the top of Seattle’s Smith Tower. The 7 or so years-long path between the two events was littered with starts and stops, victories and defeats, hair-pulling, time bending, tricks and theatrics, and at least one bulk pack of #10 Exacto blades. With the deadline in sight, we had a lot of pieces to tie together, and needed quick resolutions to postponed decisions. Specifically, the brick wall needed finishing, along with all the little painting details, the proscenium arch needed cutting and assembling, and there were sets to be painted.
The project was designed to resemble a theater interior on three sides, with a brick exterior wall and stage entrance at the back.

Theater rear view. Note cutaway wall at the bottom for viewing the dressing and make-up room.
If you do much nosing-up to brick buildings, you know that there are distinct brick patterns, designed both for aesthetics and strength. In miniature, the “fun” is determining a pattern, outlining it, then making it work within the confines of the wall. A common pattern found on the walls of many Victorian buildings in Port Townsend, WA, was 5 horizontal rows of full bricks—the length of the brick facing out–then one row of shorter brick “ends” –the width facing out–representing bricks turned 90 degrees to run crosswise into the building for strength. Aka five rows of long bricks, followed by one row of short bricks, and repeat, up the wall. But then, when we looked harder, we discovered there was variation in the numbers of long and short rows–you don’t have to be a slave to rules, just be sure you know them.
As I have written before (see my entry A Brick in Time), we cut our bricks ( 3/16″wide X 5/8″ long X 1/16″ thick) from old brick-pattern vinyl floor tile, which is no longer available. (For making a similar Fimo brick, see our website at http://www.thomasopenhouse.com/tips_fimo.html.) There are many other good brick solutions—individual brick facades cut from stripwood, or sculpted from various polymers, paper clay, gesso, or cut from mini brick sheeting. Whatever you use, you’ll want to apply individual bricks, not sheets. Sheets of molded brick, applied as is, just look like sheets of molded brick, and will detract from the other painstaking, wonderful work on your project. And while I’m being preachy, measured-to-scale full bricks (as opposed to thinner (approx. 1/16th”) brick facades), will add excess weight, thickness, and calculation headaches to your project. And it will look heavy, out of scale. Less is more, as the old axiom goes. You’re not building a wall or a chimney, you’re creating an illusion by adorning a piece of plywood with a suggestion of brick. Trust the viewer to fill in the rest.
Rule 1: There is no perfect solution. Rule 2: Whatever you use will need some paint and texture alterations to make it look “natural.” Rule 3: It’s all about illusion, the illusion of reality.

Outer brick wall construction, where individual bricks are cut from a scored sheet oh vinyl floor tile, then glued on individually, in rows.

Further along, this shows how you can apply bricks on top of bricks to frame door and window openings.

After mixing a grout of Bondex Quick-Patch cement with water, it is applied by scrubbing it into the bricked area with a sturdy 1″ foam brush.

Before it dries, most of the grout is then scrubbed into the spaces between the bricks, and off the surface.

Adding the owner’s name to the back of the building. Notice how the edges of some bricks have been aged by carving with an Exacto knife.

Stage door area finished, complete with a Thomas garbage can made from old wine bottle leads.
When I joined my college theater department, a very small department, in my junior year, they were thrilled, not because of my great acting skills, but because, due to lack of interest, and the small number of theater majors, no one was the head of the scene shop. Despite the fact I had never touched a power tool, and was afraid of heights (theater ladders are very tall), it turned out to be a good match–I liked the backstage area better than the front, and wanted to include some of this in the project. Thus I convinced Noel to paint a scene shop and costume area on the side walls of the base. Regrettably, these photos don’t do the work justice. Using watercolors, gouache and acrylic washes, he painted the scenes as more of a hint of the theater workings, so as not to detract from the grand splash of the proscenium and stage front. I think of it as a voyeur’s-eye-view of what’s going on inside. Not too much is explained, but enough to nudge you toward the illusion of theater.

Side view of the stage area, with a frieze of the scene shop and costume areas covering the side of the project base, painted by Noel with watercolors and gouache.
A theater needs an orchestra pit, and an orchestra. The inspiration for this one came, again, from the book on toy theaters. Here you can see Noel’s original sketch, and the finished frieze.
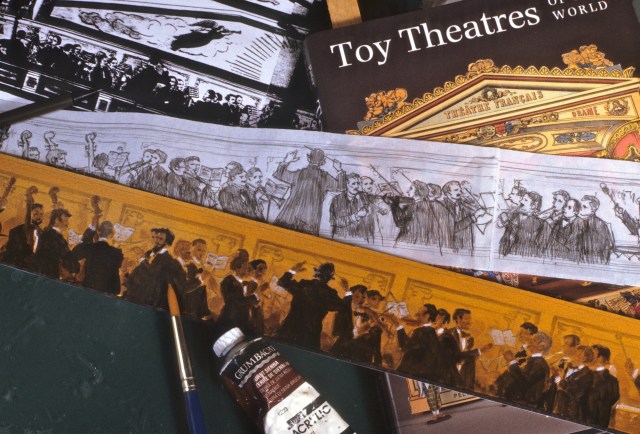
Orchestra illustration.
From the start, the proscenium frame construction was The Big Problem we kept in the back of our minds. In keeping with the tradition of toy theaters, we wanted it to be ornate, extravagant, even flashy, in the mode of Broadway and major world theaters. Given our limited carving skills, and entire lack of knowledge of casting, we knew it had to be a found material. I don’t remember if it was a trip to a museum, or when Noel took some of his paintings into the frame shop, but one day there it was, practically jumping off the walls at us–gilded picture frame molding. Our local framer just happened to have one strip of the golden cherubs left over from another order, and perfect for our purposes. After that they found coordinating framing for the top and sides. As the cherubs were the last of their kind, the tricky part was going to be finding where to cut the strip so that there was a balance of similar figures on either end, and a center of interest the center. One mistake could ruin the piece and set us back to hunting again. Like all good procrastinators, we decided to think about it some more. But then one morning, Noel made the fateful cut, and with only a little putty and gold paint to fill a joint, got it right.

The sets were left to the end, more or less as a treat for Noel to paint after the hard work of the theater was done. The theater’s owner-to-be lived, year round, among his huge collection of Christmas decor, full-size and miniature. He was also nuts about (no pun intended), and a supporter of, Seattle’s annual Nutcracker Suite production, with its outsize sets by children’s book writer and illustrator, Maurice Sendak. Both these traits made it easy to decide what sets to make for him.

Davis Miniature Theater with Nutcracker Christmas set

Davis Miniature Theater with Nutcracker Christmas set
With the theater complete, we had only hours to pack it into the van for the trip to Seattle, and dress for the birthday party presentation. I was always nervous about transporting our work, as it was not secured in the back, just sitting on its own weight, padded with quilts and pillows to soften the blow should we have to stop fast, or get bumped. Smart people would have built a barrier, some kind of gate closing off the front of the van, but we were too busy trying to meet deadlines to think of that in time. Again the gods smiled on us and we made it safely to the basement parking garage of The Smith Tower. The gods were less kind when when Security would not allow us to park, or unload near the elevator. We found a restaurant busboy to loan us a rolling metal bus cart, and loaded the theater on, with the edges of the base hanging over the edges of the cart. From there, with Noel pushing ,and me guiding and holding the project to the cart, we negotiated a long, sloping ramp up to the next floor, wobbling our way, finally, to the elevator, only to find we had two elevators to take to the top, and no one was happy about it. A little frazzled, we made it to the dining room filled with people, acting as if this had all happened by a little magic.


What a wonderful theater and a wonderful post, I loved seeing it and reading it’s story. Each post you do is more magic then the one before it!
Thanks, Linda. It was a tough project to wrap up–in miniature and on paper!
Utterly fantastic story and accomplishment.
I am honored to read this story and to know that there are real hands and minds behind it.
Thanks, McLaren!
Your work becomes ever more magical! The theatre is just magnificent; you are both an inspiration.
What a wonderful story–an unfolding of your creative processes.
Thanks so much for your generosity in sharing this.
Thanks, Amy, I’m glad you’re enjoying it.
I check back with your blog every once in a while and relish each new post. Excellent theater. You guys are masters. Thank you for sharing your detailed accts of building. I love it so much.
Thanks, Hannah, glad to hear you enjoy it. Hope to have a new one up in a couple of weeks.