
The Breeze Appliances
In 1996, two years after we began work on miniaturizing The Breeze fried clam stand in Castine, Maine, a friend wrote in a Christmas card that it had sold. When Noel and I began the design, the then current owner invited us in to photograph and measure his new venture. For him it was a retirement business—a possibly fun and profitable way to spend his summers. For us it was architectural history in the making—a piece of the town saga worth its salt. The next summer, when we brought the miniature Breeze back, he liked it all right, and welcomed our students in to poke around and photograph the aging shingles, and jury-rigged interior, but he didn’t quite catch on to our affection for the place. He was too busy breading clams, cleaning fryers, and setting up for a busy summer day.
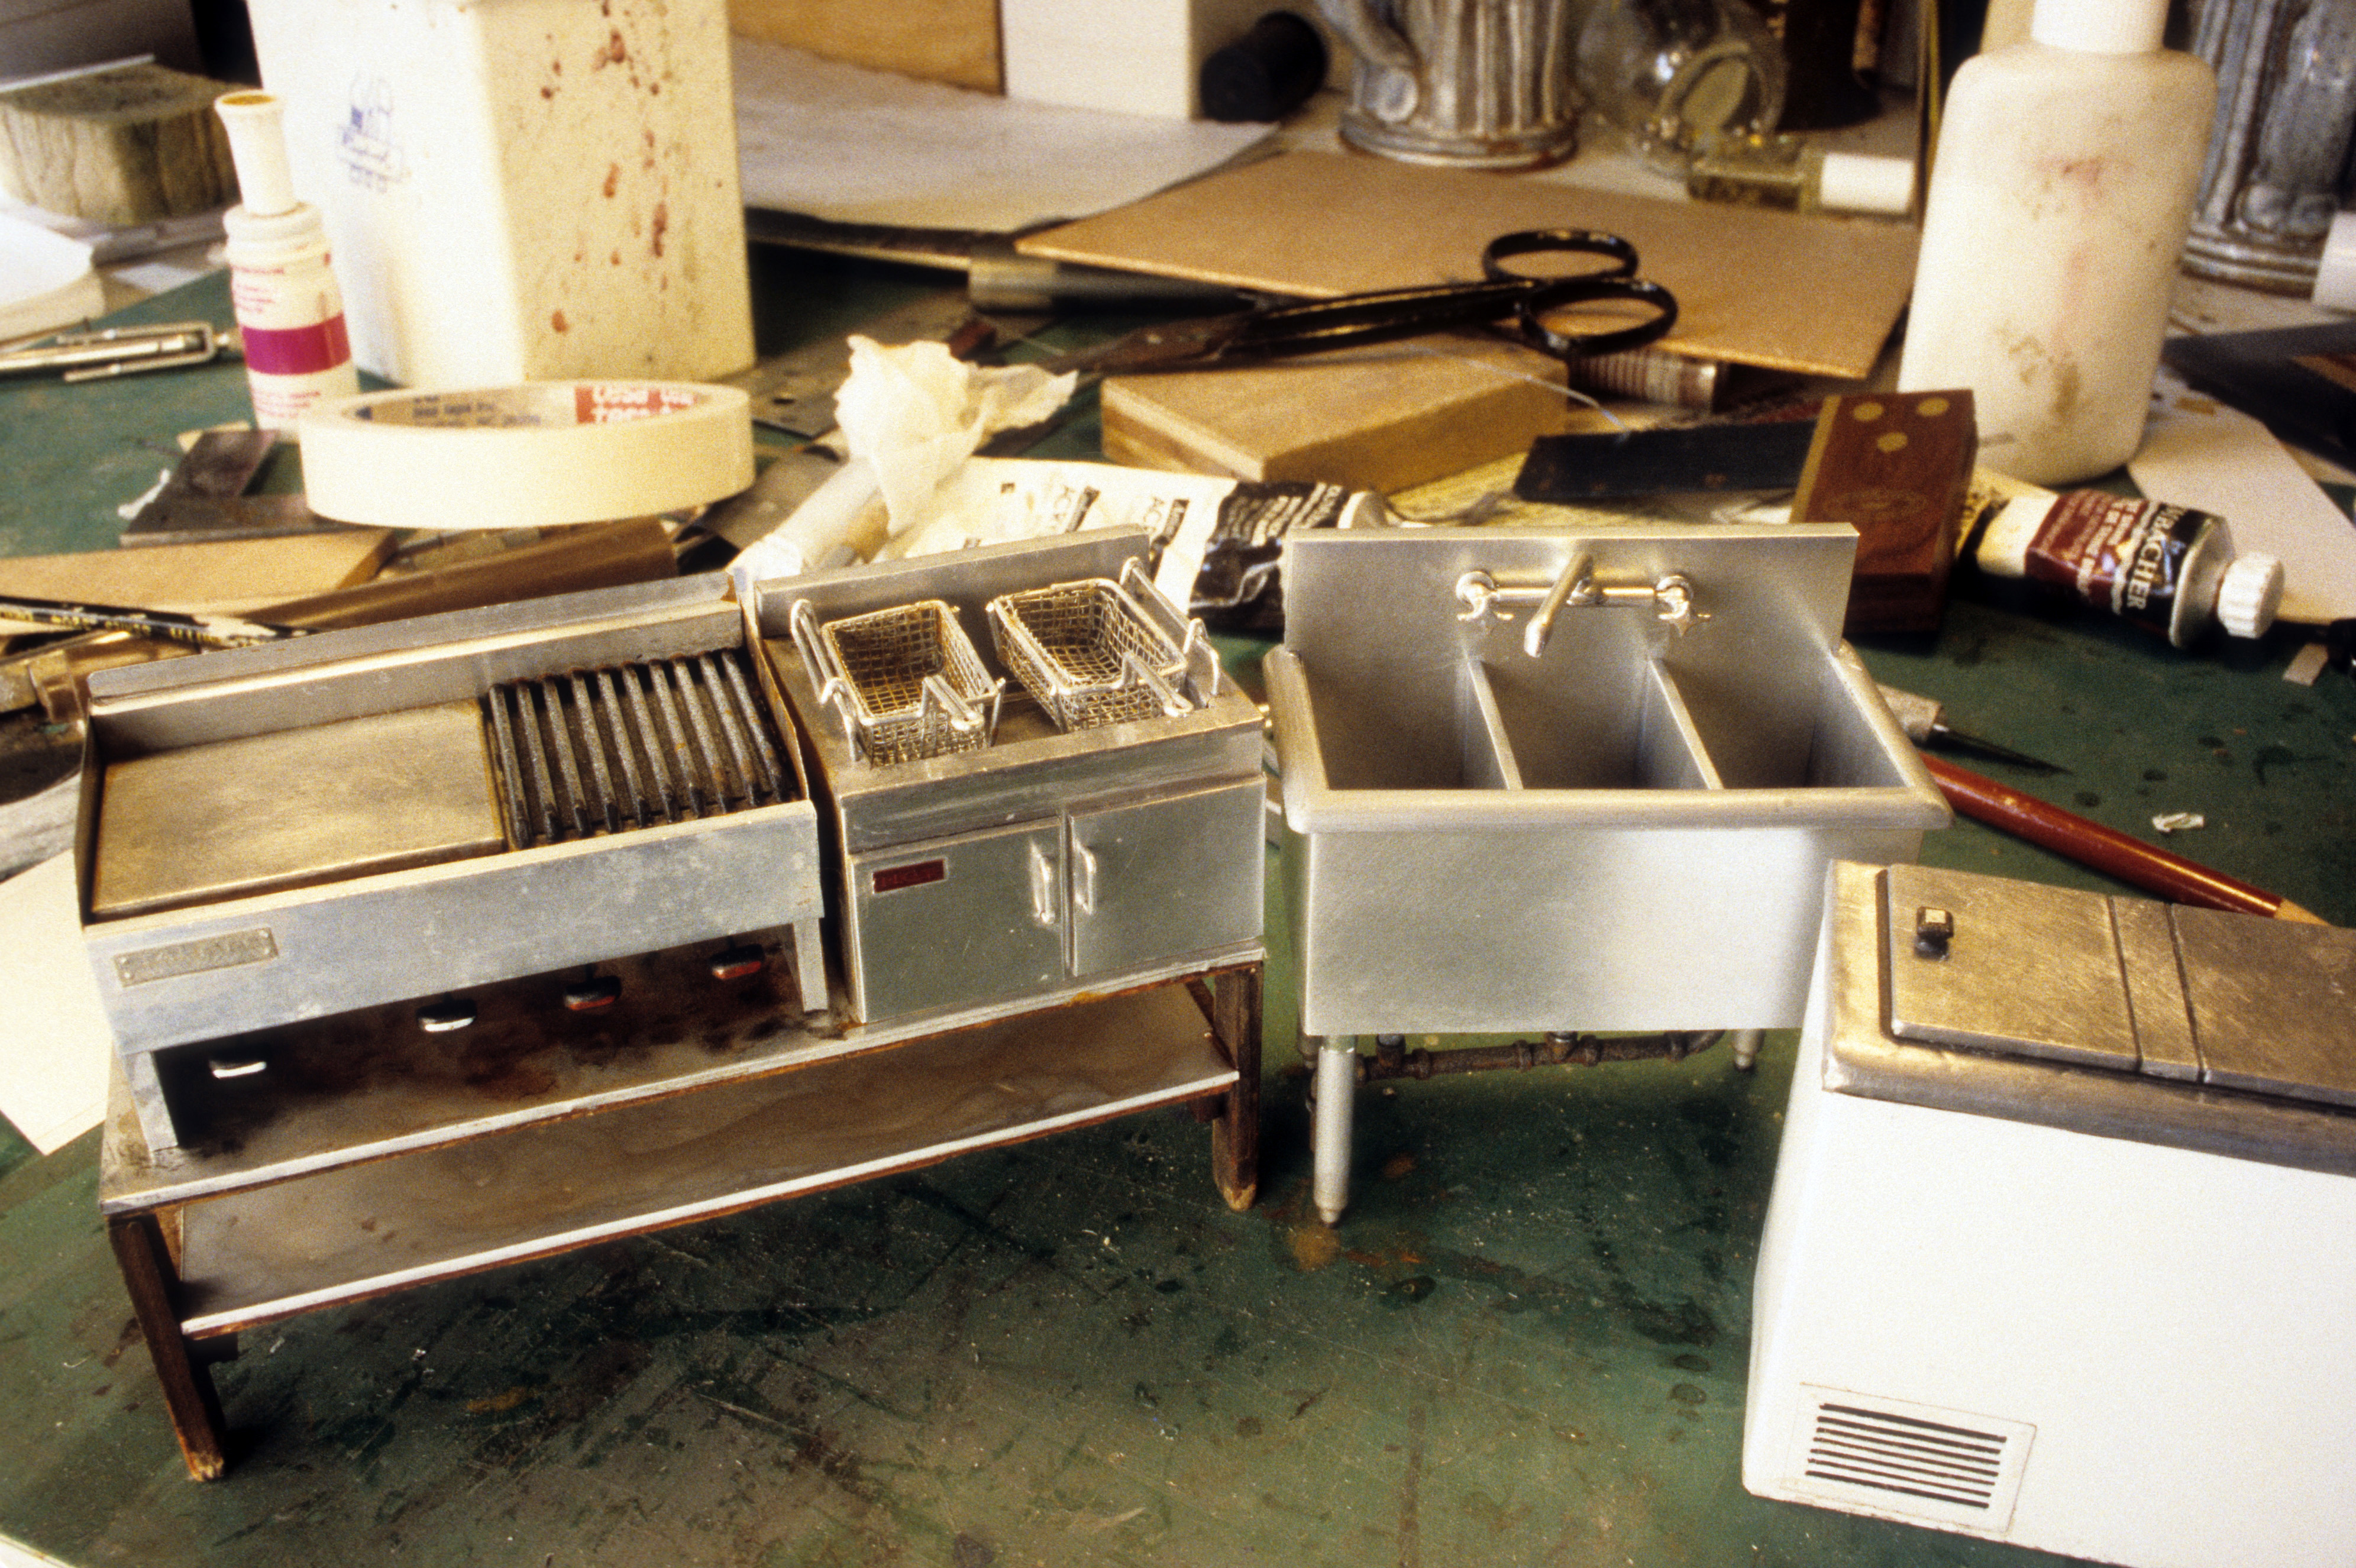
Aside from the vent fan, the grittiest part of the Breeze is the interior, the working part of the kitchen with its gas grill, metal fryers, stove and sink. Even with 54 miniature structures under our belts, creating the interior of the food stand (cousin to the greasy spoon, defined by Urban Dictionary as serving “food that is often delicious, and always bad for you) was no simple task. We specialized in illusions made of wood and paint–recreating “the look of metal” was a most mind-and-materials-stretching venture. The following directions could be titled: “Metal-Working for Those Who Failed Metal-Working 101.”
What we devised for the interior is perhaps best described as the essence of appliances. These built-in pieces can be viewed only from a distance—through windows and the removable roof access. They are fabricated from bits of wood and aluminum held together with glue. If the items were meant for hand-held inspection, we would have commissioned a real metal-smith–someone of Bill Hudson’s caliber–to make more refined versions of the real thing. The bad news is, the interior photos of the finished project after aging are missing (and, oddly, or scarily, so is our memory of doing the work). The good news is that I wrote about it at the time, and still have the files.
Our aim was to make these stationary pieces in scale, looking well-used, and “feeling” enough like the real thing to be believable. We worked from photographs of the full-size Breeze, backed-up by notes and our own recollections. Our having both worked as short-order cooks gave us another level of practical experience to draw from. It helps to have a feel for the surroundings you want to recreate in miniature; your imagination kicks in when knowledge, measurements, or photos don’t quite cover it.

Fryer box and baskets before aging
For the deep fat fryer, Noel began by building a rudimentary utility table with 1/8″ X 5/16” basswood legs, and with a top and lower shelf made from veneer ply (aka doorskin) covered with aluminum printing plate (described below). The table was designed to hold both the fryer and the hamburger grill and fit along the structure’s back wall. He let the available space determine the size of the table and appliances.
The behind-the-scenes deep fat fryer box can be built from 3/16″ or ¼” thick plywood, either of which is hefty enough to be held together with glue. Build the box—no fancy corners needed—and cover it with aluminum sheeting attached with Elmer’s white glue.
We bought the hand-bendable sheet metal from our local printer. It was called Western Linotech single-sided aluminum printing plate (the same material used for roofing in my Putting a Roof on It posting). Now that computer printing has taken over, you’ll be hard-pressed to find this, but rolled-out wine lead, or lead sheeting (see below for sources) make decent substitutes. (For a different approach, see the entries for The Airplane Cafe, and Fish and Fries).
Once the glue is dry, shape a single piece of printing plate to cover the sides and front (the back will never be seen). To cut the pieces to size, use the tip of an Exacto knife guided by the edge of a metal straight edge to scribe—without cutting through—the aluminum plate. Bend the piece along a sharp table edge and break along the scribed line. Hand bend the cut piece around the box, and glue it on with Elmer’s. The non-working doors in front–where the fryer grease is cleaned out of the real thing–are cut from 1/16” airplane ply (Micro Mark catalog), covered in the same metal, and glued on the front of the box. Whatever material you use, it helps to make a paper pattern first, to determine where to clip the metal corners to make a snug and true fit.
The door handles are made from 19 gauge aluminum wire (hardware store). Noel bent the handles into shape with round, fine needle-nose pliers. He drilled holes in the doors with a pin vise, and glued the wire ends into the holes. The red “brand name” logo plates on the left door he cut from wine bottle “lead,” the kind that seals some corked wines. (These days this material is really a malleable plastic that looks like metal, and may have some metal content, but it looks right). Noel embossed the sign lettering from the back, writing with a defunct fine-tipped roller ball pen (the brand name is HOT!), then colored the front with a red felt pen, and glued it to the door with Elmer’s.
The inside and top lip of the box are lined with strips of thin lead sheeting, because it is easier to mold than aluminum plate. If your miniature store doesn’t have any, try hobby or stained-glass supply stores. Finish the box by adding two wire handles on which to hook the fryer baskets. The handles are simply longer versions of the wire door handles, set into the top edges of either side of the box.
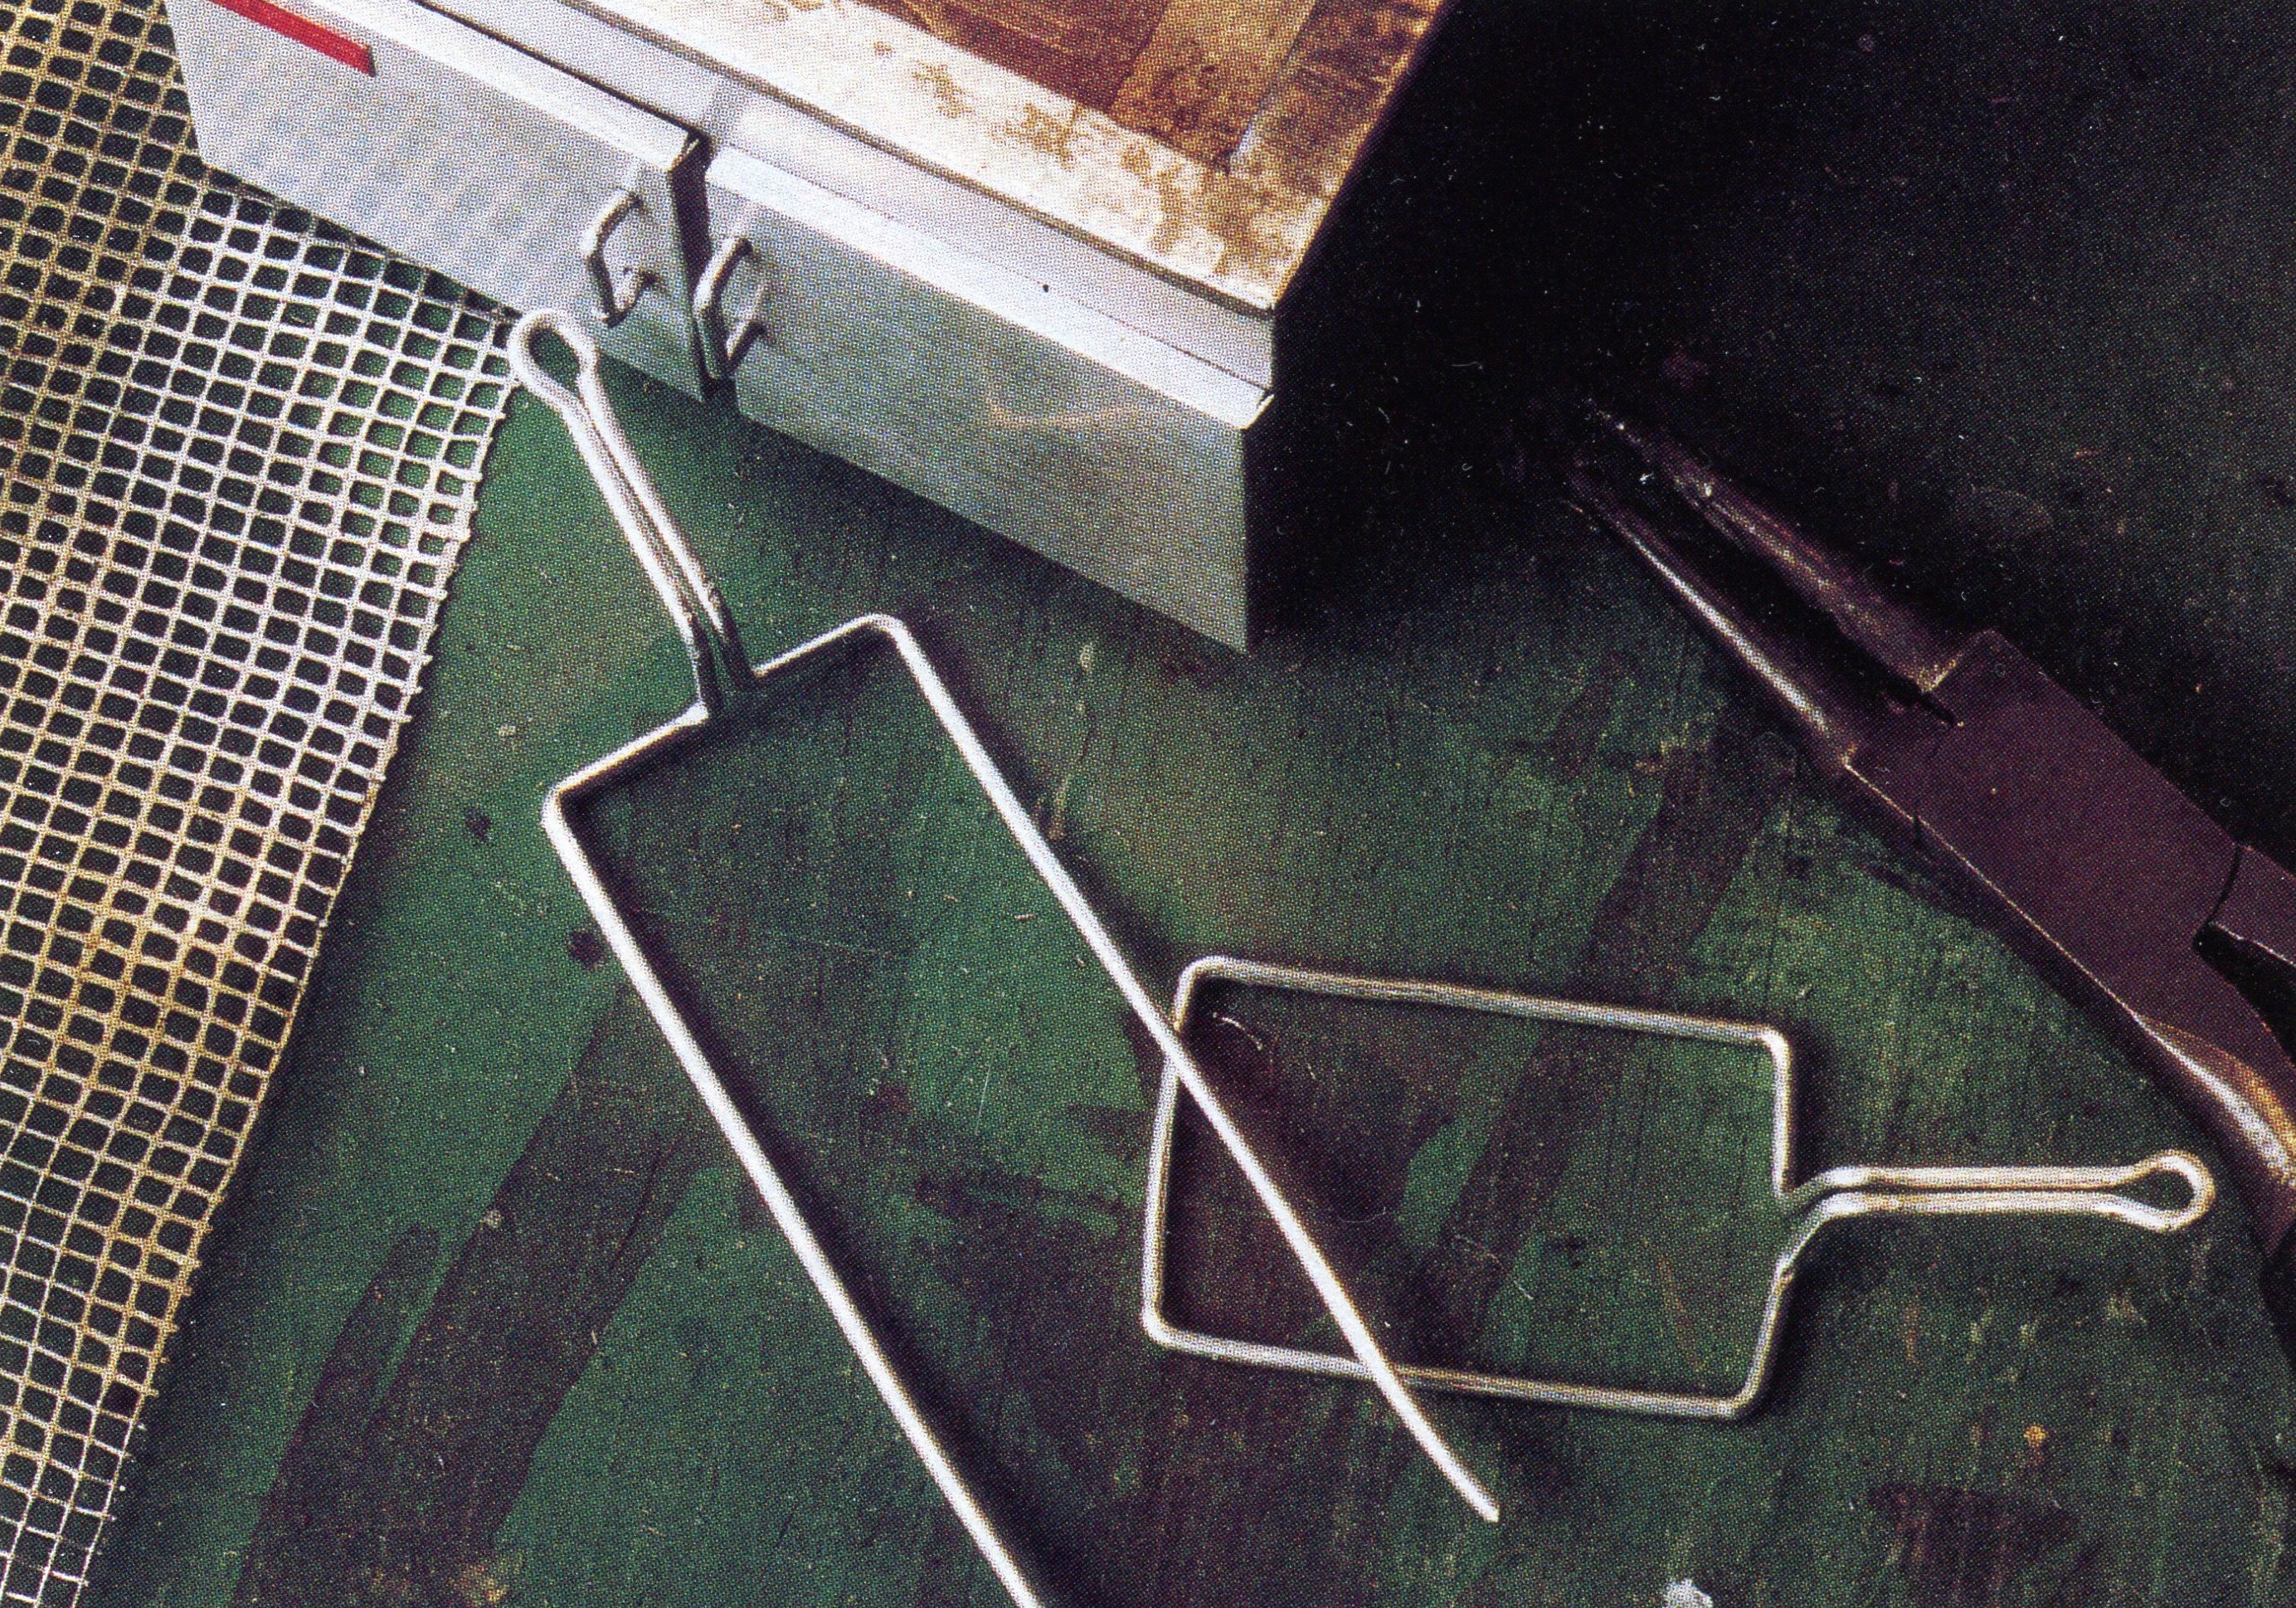
Wire framing and hammered screen mesh used for fryer baskets
The fryer baskets take some practice. Make the framing from two pieces of aluminum wire, the same kind used for the door handles. Referring to the photos and diagrams, cut and fold a paper pattern to determine the basket size: smaller than the fryer box interior, and with room for a comfortable space between the two. Also, the bottom of the basket should be narrower than the top. For ours, Noel shaped the basket around a section of ½” sq. basswood, standing it on end to form the lower corners and the width of the basket bottom.
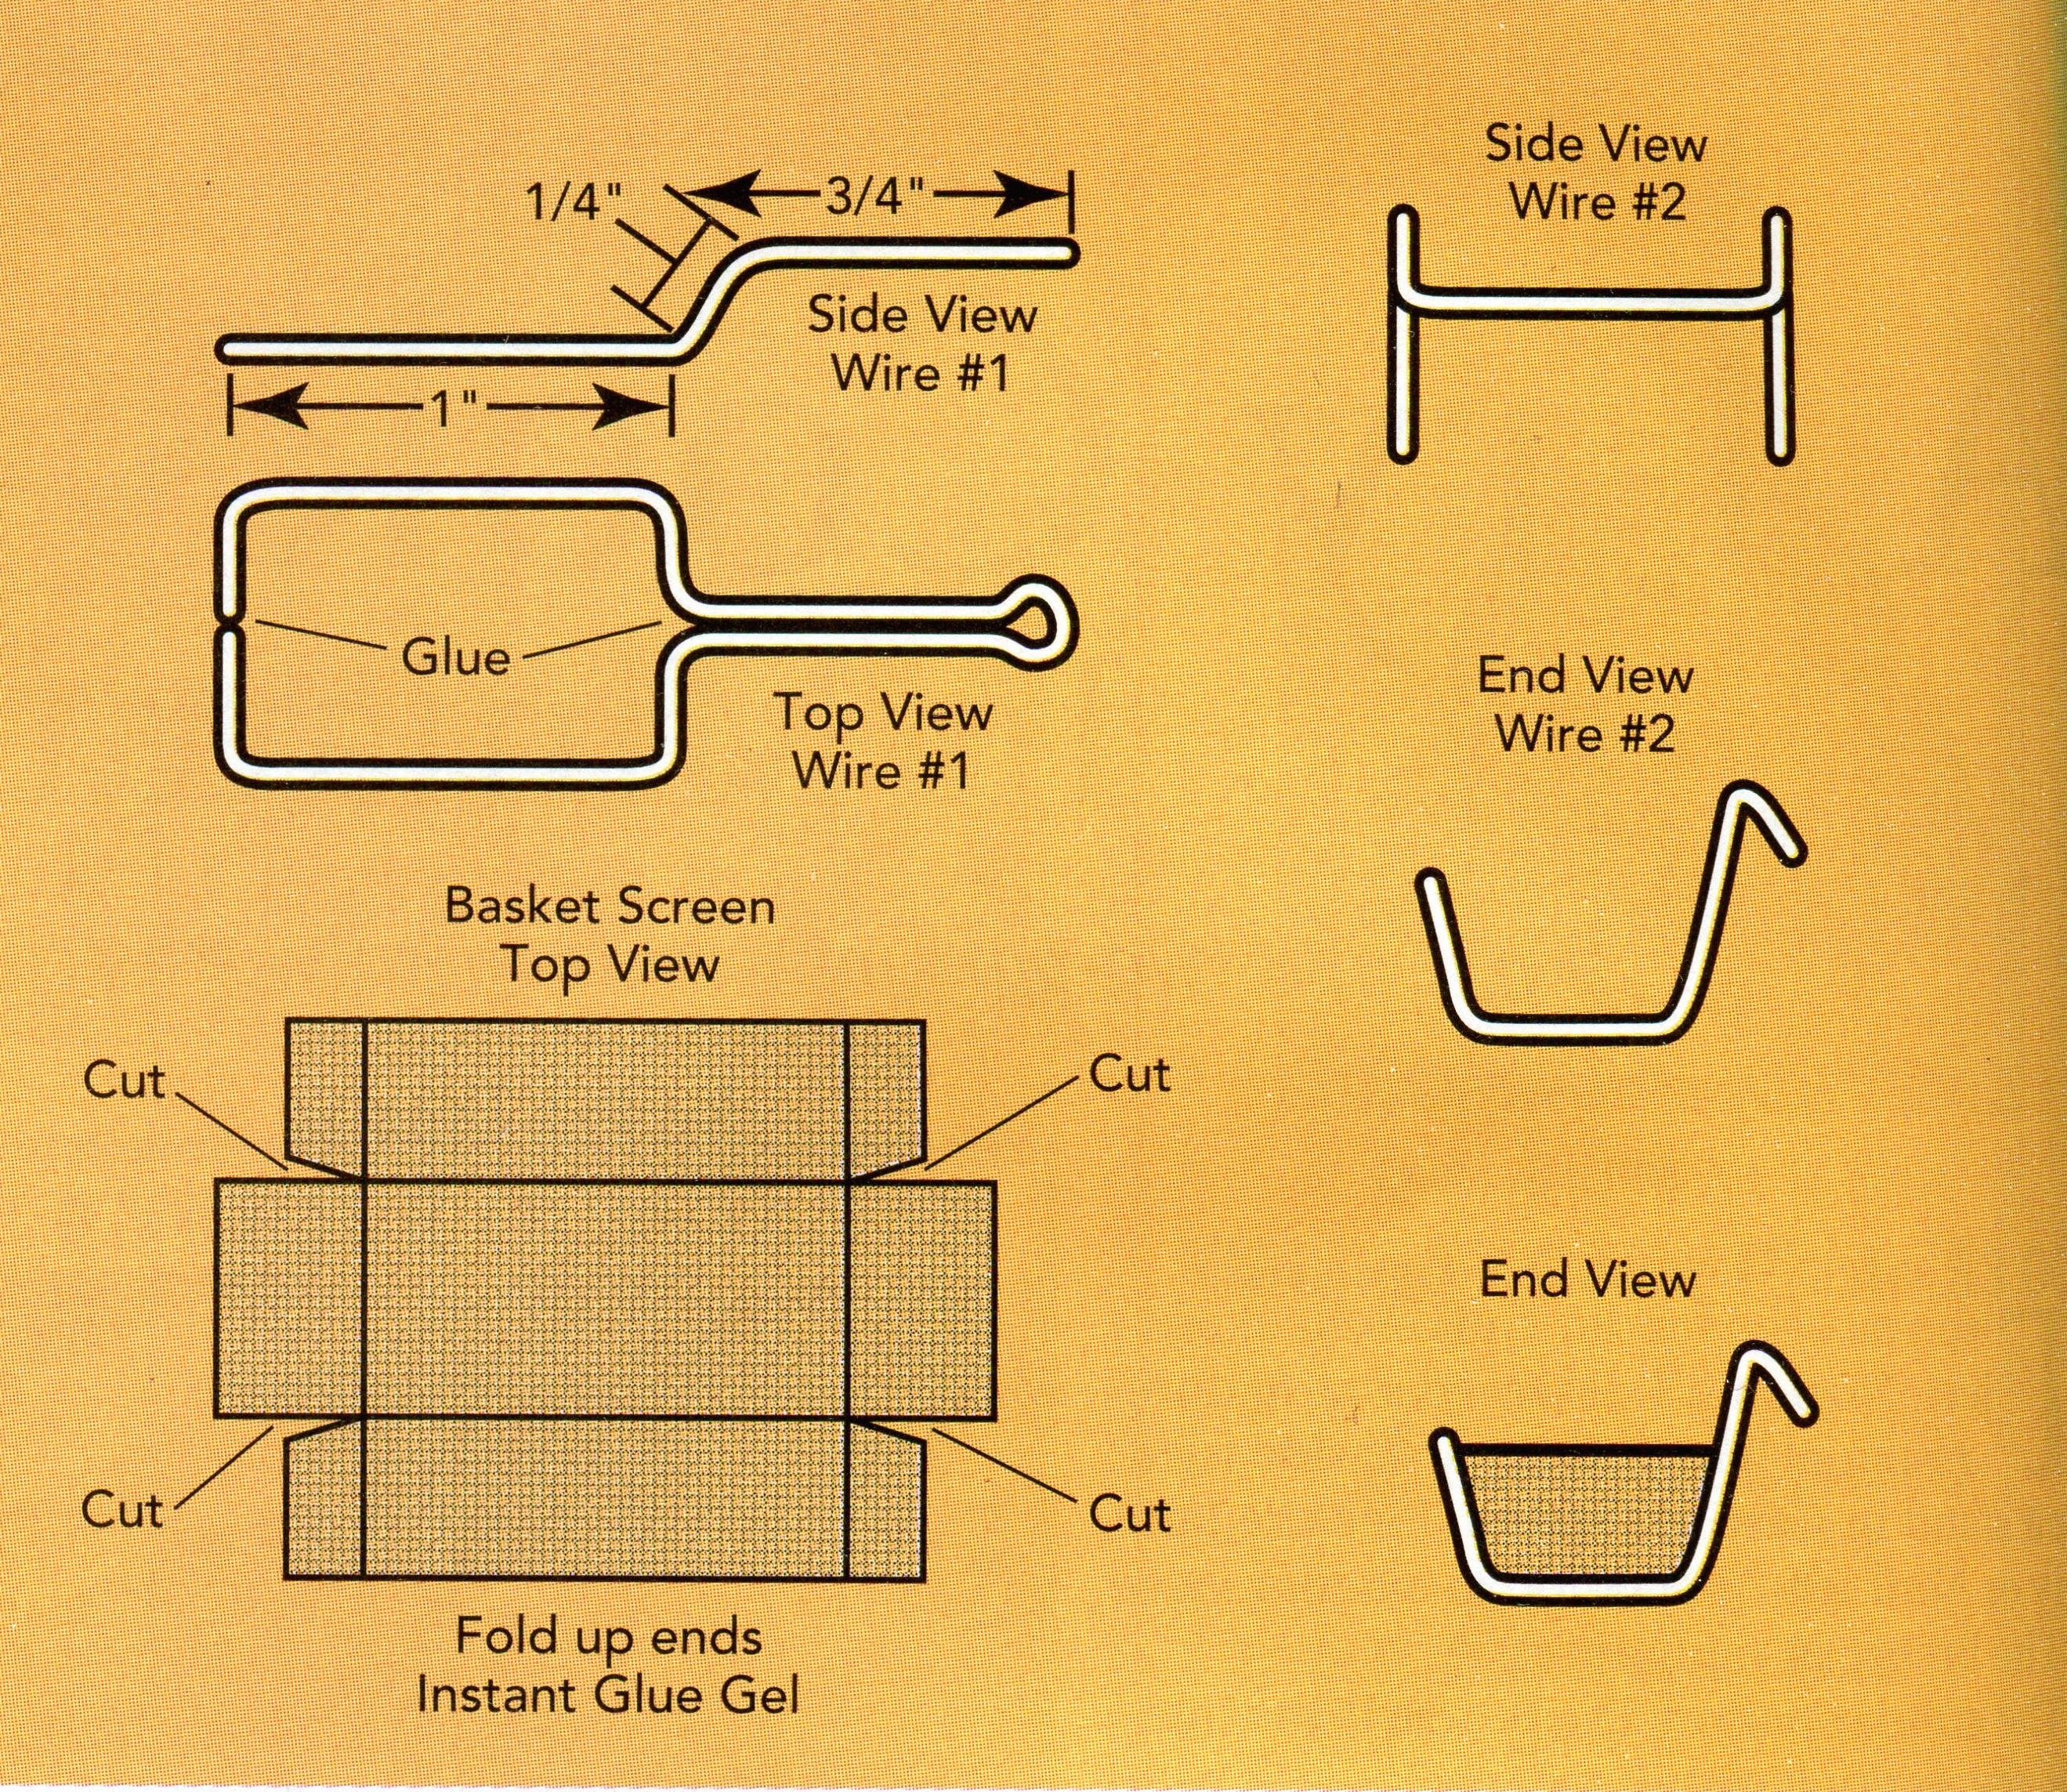
Fryer diagram
Once you have a suitable paper basket, use another piece of paper to draw an outline of the shape and size of the handle and frame for the rim of the basket. Make it a little larger than the top of the basket pattern because it will be glued to the outside edge of the basket mesh. With the drawing as a guide, use the round needle-nose pliers to shape a single piece of wire into the handle and top-of-the-basket framing (wire #1). Have patience. The process will work, although it may take a few tries to get it right. Glue the wire together at base of the handle and the back of the basket (opposite the handle) with instant glue gel. Repeat the process for the second basket, using the same pattern so the baskets match as closely as possible.
Before shaping the rest of the framing, feel free to pound out your frustrations on the basket mesh. This piece is made from aluminum window screen flattened with a hammer. Lacking any screen scraps, we bought a whole roll at the hardware store for about $9.00. You might be able to buy just a piece at your hardware store, or maybe find an inexpensive window screen at Goodwill.
With wire cutters, cut out a piece of screen about 1 ½” sq. for each basket, and hammer the mesh wires flat on an anvil. With your paper pattern and the wood form, trim the screen and clip the corners to hand-form the basket. To help prevent the screen from unraveling, paint the whole piece with water-thinned Elmer’s. Thin the glue enough to prevent the mesh from filling with glue. Noel used a hairdryer to blow the thinned glue out of the holes.
 Once the mesh is dry, mold, fold and crimp the screen around the wood form to create straight edges. The depth of Noel’s basket (where he made the first bend) is five screen squares down from the top edge. The length of the basket is determined by the size of your frame. Work gingerly, and run a bead of Elmer’s along the rim edge of the basket to further reduce the screen’s tendency to unravel. Work to keep the mesh square across the sides and bottom.
The screen must overlap somewhat at the front and back of the basket to have ample gluing surface. Some overlapping works to give the illusion of holes clogged with pieces of breading and clams, but too much will look like—well–too much. An illusion is a suggestion, not a justification for clunky work. Trim away any excess screen and glue the ends with instant glue gel.
Bend a second piece (wire #2 in diagram) to frame the sides and lower part of the basket and form the side draining bracket. Use the basket and top frame (wire #1) as a guide, bending the wire around the wood form with the needle-nose pliers. The trick to making the basket symmetrical is to make the bends in the wire even lengths on either side of the basket. Once wire #2 is bent into shape, glue it and the basket to the top wire frame with instant glue gel. Be patient, and give it your best. Then give it another day before deciding if you need to make a better one.
At last comes the fun part, painting on the grunge that will transform your labors into a credible, almost smell-able, fryer. (For research, I recommend a field trip to the nearest greasy spoon to try some of that oh-so-good-but-bad-for-you food.) Our dirty grease formula consists of Grumbacher tube acrylics in Burnt Sienna, Raw Sienna, and Mars Black. These colors, in varying combinations, are the same colors we use for rust. If you’ve ever really looked at a short order kitchen’s working parts, you’ll see the boundary between grease and rust is pretty iffy. That’s where it becomes grunge.

A different example from The Airplane Cafe, made before we used aluminum plate.
Pour about 2 tablespoons of water on a plastic plate and squeeze a little of each pigment around the plate’s rim. With a watercolor round brush, draw a little of the two siennas into the water, making a drippy wash (more water than pigment). When you have a good thin grunge color, paint it on the fryer basket mesh and down the sides of the fryer box. There should be more grease at the top of the box, with drips down the sides.
Play with the strength of the washes and color combinations. Start with a really thin wash, allowing each layer to dry, adding until you get a color you like. Finally use a bit of a very thin black wash to tone down the reddish color where needed. As the paint dries on the metal box, the pigment will separate out into visible, but not dimensional, little globs of color. The paint will heighten the already slightly “chunky” look in some of your basket mesh. If you can find a Cadmium Orange felt-tip marker (at better art supply stores), smear a little ink over the paint to slightly enhance the overall color and add a convincingly greasy sheen. As always, go gently, don’t tell the whole story–leave room for the viewer’s mind to fill in the details.
The full-size version of The Breeze, or some earlier incarnation of it, has been a part of Castine from before the first time I saw it as a child. Locals say it was originally a trailer, towed home to the driveway at the end of each summer. For a while it was called The Salty Breeze. During the 28 years Noel and I visited there it had at least five different proprietors, one of whom was a woman who was also in charge of cleaning the town restrooms at the other side of the pier parking lot—she added the touch of a vase of fresh flowers every day, at least in the Women’s. Due to the number of ownership transitions, I suspect The Breeze at first appears as a dream of a slower-paced life, of taking things easy, of frying a few clams to salt away some extra cash. As is all too usual, full-scale reality is grittier than the dream.
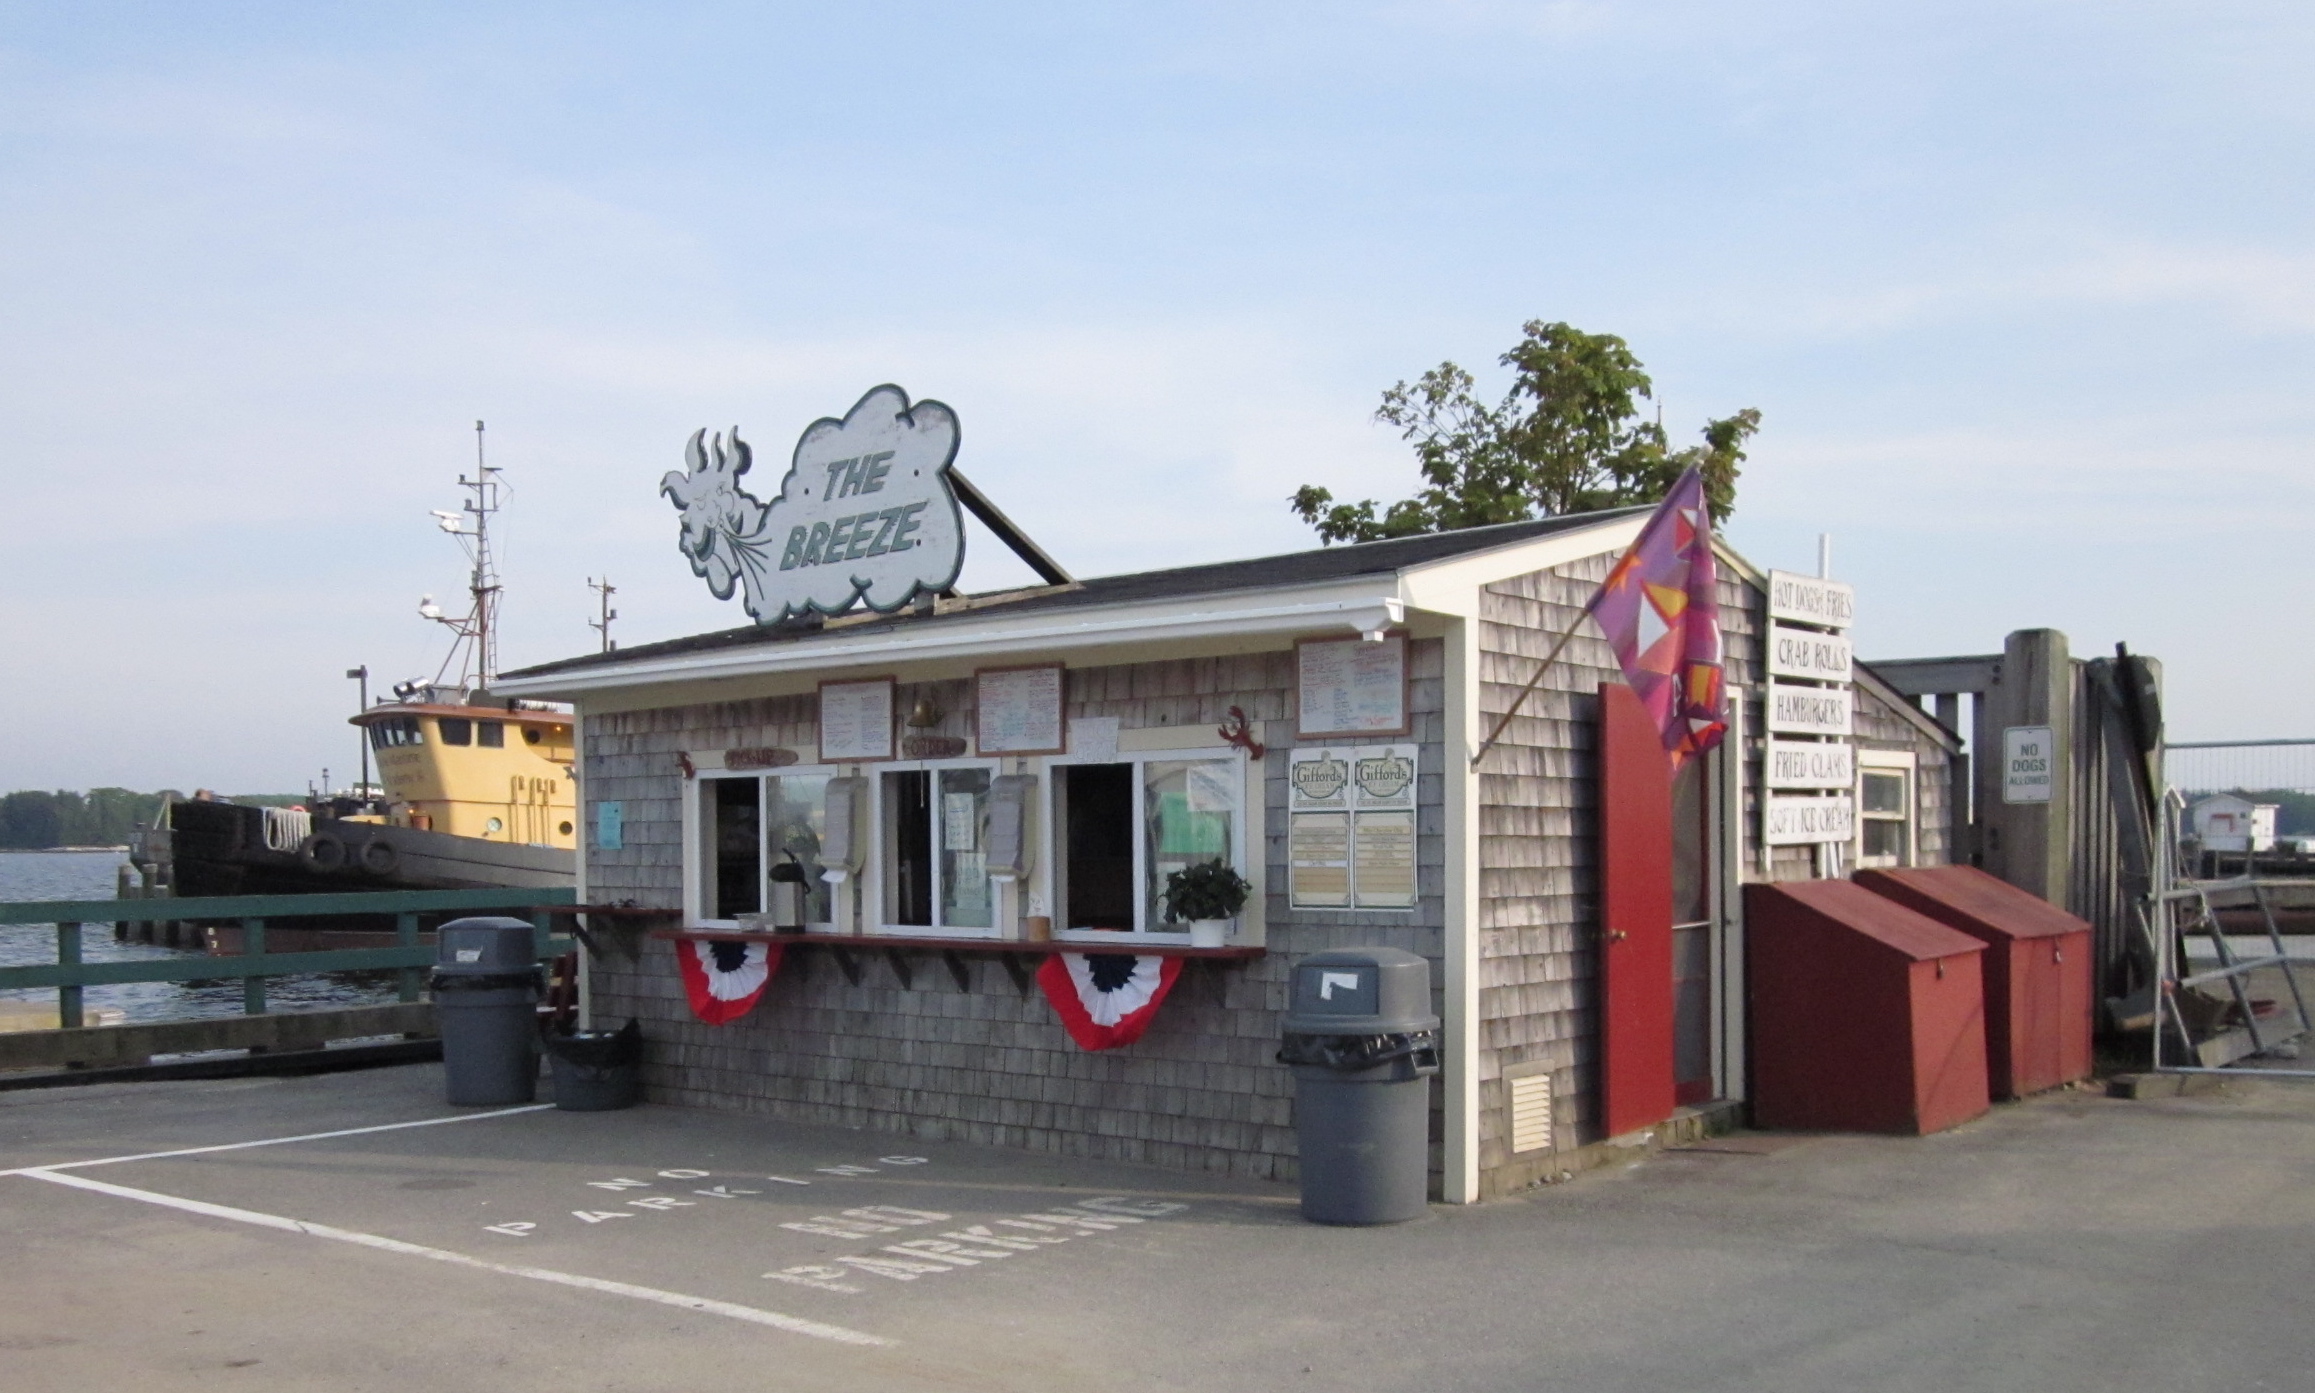
Living the dream–the full-size Breeze in 2011, with no awning.

I love following the Breeze creation stories
Thank you. It’s hard keeping the story alive when writing these specific technical pieces.
Is there ANYTHING y’all have done that I don’t adore and admire? Thanks for Part 1- is a joy to read! Barbara Ann
Thank you–more to come!